Are you looking to give your roof a thorough cleaning?
Pressure washing is a great way to remove dirt, debris, and algae from your roof’s surface, leaving it looking clean and fresh.
In this article, we will guide you through the steps of how to pressure wash your roof effectively and safely.
Before you begin, it’s important to take some safety measures.
Make sure you have the right equipment, such as safety goggles, gloves, and non-slip shoes.
Additionally, prepare the area around your home by removing any obstacles or fragile items that could be damaged by the water pressure.
By following these precautions, you can ensure a safe and successful roof cleaning experience.
Preparation and Safety Measures
 Before you begin pressure washing your roof, it’s essential to take the necessary precautions to ensure your safety and protect the integrity of your home.
Start by thoroughly inspecting the roof for any loose or damaged shingles. It’s important to repair any issues before pressure washing, as the high-pressure water can cause further damage.
Additionally, remove any debris such as leaves or branches that may be on the roof. This will prevent clogging of the pressure washer and ensure a more effective cleaning process.
Next, it’s crucial to protect yourself during the pressure washing process. Wear protective clothing such as long sleeves, long pants, and closed-toe shoes to shield your skin from any potential injuries.
Additionally, put on safety goggles to protect your eyes from debris or water splashes. It’s also recommended to wear a safety harness or use a sturdy ladder to prevent falls while working on the roof.
Lastly, ensure that the area around the roof is clear of any obstacles or hazards to avoid accidents during the pressure washing process.
By following these preparation and safety measures, you can ensure a smooth and safe pressure washing experience for your roof. Taking the time to properly prepare and protect yourself will not only prevent any potential injuries but also help maintain the structural integrity of your home.
Now that you’re ready to begin pressure washing, let’s move on to the next section of this article.
Choosing the Right Equipment
When it comes to choosing the right equipment for pressure washing your roof, you should make sure you have the proper tools at your disposal.
The first thing you will need is a pressure washer specifically designed for roof cleaning. These machines are specifically designed to deliver the right amount of pressure without causing damage to your roof. Look for a pressure washer with a PSI (pounds per square inch) rating between 1,200 and 2,400, as this range is generally considered safe for most roofs. Additionally, make sure the pressure washer has a low-pressure nozzle or attachment specifically for roof cleaning, as this will help prevent any accidental damage.
In addition to the pressure washer, you will also need a safety harness or harness attachment system. Cleaning a roof can be a risky task, and using a safety harness will help keep you secure while you work. Make sure the harness fits properly and is comfortable to wear for extended periods of time.
It’s also important to have a sturdy ladder that can safely support your weight as you climb up and down to reach different areas of the roof.
Lastly, don’t forget to wear appropriate safety gear, such as goggles and gloves, to protect yourself from any potential hazards.
By choosing the right equipment, you can ensure a safe and effective pressure washing process for your roof.
Cleaning Solution Options
To effectively clean your roof, you should consider using a specialized cleaning solution that helps remove dirt and debris without causing any harm.
There are several cleaning solution options available for pressure washing your roof. One popular option is a mild detergent mixed with water. This solution is gentle enough to not cause any damage to your roof, yet strong enough to effectively remove dirt and grime.
Another option is using a bleach solution. Bleach can be effective in killing mold and mildew, which are common issues on roofs. However, it’s important to use bleach in the correct concentration and to rinse it off thoroughly to prevent any damage to your roof or surrounding vegetation.
Additionally, there are eco-friendly cleaning solutions available that are safe for the environment while still providing effective cleaning power. These solutions are often made from natural ingredients and are a great option for those who are conscious about the impact of chemicals on the environment.
When choosing a cleaning solution for your roof, consider the type of roof you have and any specific cleaning needs it may have. It’s always a good idea to test the cleaning solution on a small, inconspicuous area of the roof before applying it to the entire surface. This will help ensure that the solution is safe and effective for your specific roof type.
Setting Up the Pressure Washer
 Get ready to start by preparing your pressure washer for action! Before you begin pressure washing your roof, it’s important to set up your pressure washer properly.
Start by connecting the water source to your pressure washer and make sure the water supply is turned on.
Next, attach the high-pressure hose to the pressure washer and tighten it securely. Then, connect the spray gun to the end of the high-pressure hose and ensure it’s tightly fitted.
Once your pressure washer is set up, it’s time to prepare the roof for pressure washing.
Begin by removing any loose debris from the roof surface using a broom or a leaf blower. This will help prevent any clogs in the pressure washer and ensure a more effective cleaning.
Next, cover any nearby plants or sensitive areas with plastic sheeting to protect them from the cleaning solution and water spray.
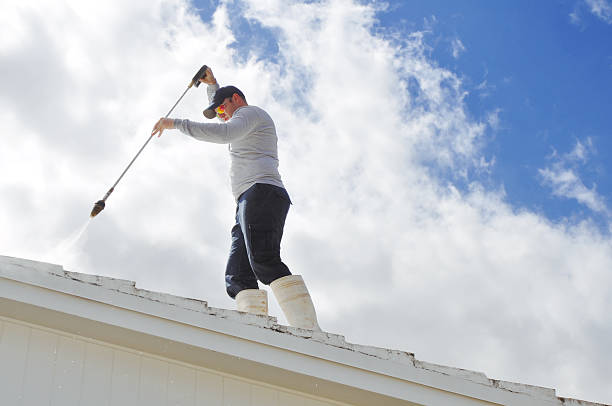
Finally, position yourself safely on the roof, making sure to wear appropriate safety gear such as non-slip shoes and a safety harness if necessary.
With your pressure washer set up and your roof prepared, you’re now ready to move on to the next step in this article section: applying the cleaning solution.
Techniques for Cleaning the Roof
Ready to give your roof a sparkling clean? Let’s dive into some effective techniques for sprucing up your home’s topmost surface!
When it comes to cleaning your roof, using a pressure washer can be a game-changer. Not only does it save you time and effort, but it also ensures a thorough and deep clean. To start, make sure you’re using the correct pressure setting on your washer. Too much pressure can damage your roof, while too little may not effectively remove dirt and grime. It’s best to start with a low-pressure setting and gradually increase if needed.
Be mindful of the angle at which you spray. Aim for a 45-degree angle and work in small sections. This will help prevent any water from getting under the shingles and causing damage. Remember to always spray in a downward motion to allow the water to flow off the roof easily.
Next, pay attention to the type of detergent you use. There are specific roof cleaning solutions available that are designed to be safe for your roof and effective at removing stains. Mix the detergent with water according to the manufacturer’s instructions and apply it evenly across the roof surface. Allow the detergent to sit for a few minutes to loosen any stubborn dirt or algae.
After that, you can start pressure washing the roof. Begin from the top and work your way down, making sure to cover every part of the roof. Use smooth and steady motions to avoid streaks and ensure an even clean. As you clean, keep an eye out for any areas that require extra attention, such as heavily stained spots or areas with moss growth. You may need to go over these areas multiple times or use a scrub brush for added cleaning power.
With these techniques, your roof will be shining like new in no time!
Working in Sections
 Dividing your cleaning process into manageable sections allows for a more efficient and thorough rejuvenation of your home’s topmost surface. When pressure washing your roof, it’s essential to work in sections to ensure that every inch is clean and free from dirt, debris, and algae.
Start by identifying the size of each section based on the size of your roof and the amount of time and effort you can dedicate to the task. This approach will prevent you from feeling overwhelmed and allow you to focus on one area at a time.
Begin by pressure washing the first section, starting from the top and working your way down. This way, any dirt or debris that’s dislodged will be washed away and won’t end up on areas you’ve already cleaned. Use a sweeping motion with the pressure washer, moving from side to side and overlapping each pass slightly to ensure complete coverage.
Take your time and pay attention to any stubborn stains or areas with excessive build-up. Once you’ve finished cleaning the first section, move on to the next one, repeating the same process until you’ve covered the entire roof.
Working in sections ensures that you don’t miss any spots and allows you to monitor your progress more effectively. So, grab your pressure washer, divide your roof into manageable sections, and get ready to give it a thorough clean!
Rinsing and Drying
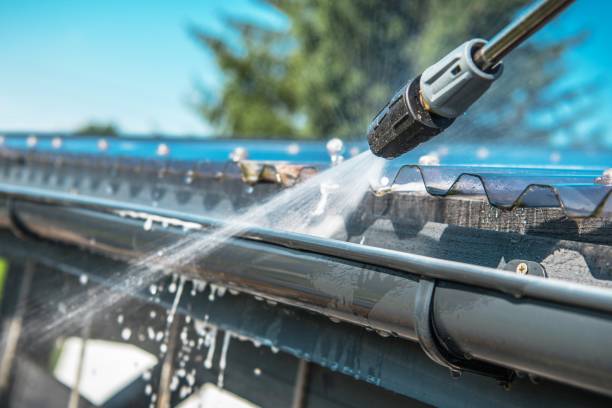
Once you have completed the cleaning process, you can then proceed to rinse and dry your roof to ensure a spotless and gleaming finish. Start by using a hose or a pressure washer on a low setting to rinse off any remaining dirt or cleaning solution from the roof.
Make sure to work in sections, starting from the top and working your way down. This will help prevent streaks and ensure an even rinse. As you rinse, pay close attention to any areas that may still have stubborn stains or debris. Use the pressure washer nozzle to target those areas and give them an extra blast of water to remove any remaining dirt.
After rinsing, it’s important to allow your roof to dry thoroughly. This will prevent any water spots or streaks from forming. If the weather is sunny and warm, the roof will naturally dry on its own. However, if it’s a cloudy or humid day, you may need to use a leaf blower or a soft cloth to help speed up the drying process.
Be sure to remove any excess water from the roof, paying special attention to the edges and corners where water tends to accumulate. Once your roof is completely dry, take a step back and admire your hard work. Your pressure washed roof will now look clean, fresh, and ready to withstand the elements for years to come.
Inspecting for Damage
Now that you’ve finished rinsing and drying your roof, it’s time to move on to the next step: inspecting for damage. This is a crucial part of the pressure washing process because it allows you to identify any existing issues or potential problems on your roof.
By taking the time to thoroughly inspect your roof before proceeding with the pressure wash, you can ensure that you’re not causing further damage or exacerbating any existing issues.
To begin the inspection, carefully walk around your roof and visually examine the surface. Look for any signs of damage such as cracked or broken tiles, loose shingles, or areas where the roof material is peeling or deteriorating. Pay close attention to the edges and corners of the roof, as these are often the most vulnerable areas. Additionally, check for any signs of water damage, such as dark stains or discoloration, as this could indicate a leak or other underlying issue.
Once you’ve completed the visual inspection, it’s time to get up close and personal with your roof. Use a ladder to access different areas of the roof and physically inspect the material. Look for any soft spots or areas of sagging, as this could indicate water damage or rot. Check the gutters and downspouts for any debris or blockages, as these can contribute to water damage and drainage issues. Take note of any areas that require repair or attention because you’ll need to address these before proceeding with the pressure wash.
By thoroughly inspecting your roof for damage, you can ensure that you’re taking the necessary precautions before proceeding with the pressure wash. This article section serves as a reminder to always prioritize safety and maintenance when it comes to caring for your roof.
Maintaining the Roof’s Integrity
Ensuring the long-term health and strength of your roof is crucial for protecting your home and providing peace of mind. When it comes to pressure washing your roof, it’s important to take certain measures to maintain its integrity.
Before starting the pressure washing process, make sure to inspect the roof for any loose or damaged shingles. Replace any damaged shingles and secure any loose ones to prevent further damage during the pressure washing. Additionally, check for any cracks or gaps in the roof’s structure and seal them appropriately. This will help prevent water from seeping into your home and causing potential leaks or water damage.
During the pressure washing process, it’s important to use the right amount of pressure and the correct type of nozzle to avoid causing any damage to the roof. Avoid using excessive pressure that may dislodge shingles or damage the roof’s surface. Use a wide-angle nozzle that spreads the water evenly and reduces the risk of concentrated pressure in one area. It’s also important to maintain a safe distance from the roof while pressure washing to prevent any accidental damage.
Finally, after pressure washing, inspect the roof again to ensure there are no new damages. If you notice any new issues, address them promptly to maintain the integrity of your roof and prevent any future problems. By following these steps, you can pressure wash your roof effectively while maintaining its integrity and prolonging its lifespan.
Professional Help and Maintenance
To keep your roof in optimal condition, it’s a good idea to seek professional assistance and schedule regular maintenance. While pressure washing your roof can be a tempting DIY project, it’s important to understand that improper techniques or excessive pressure can cause damage to your roof.
Hiring a professional for your roof pressure washing needs ensures that the job is done safely and effectively. A professional will have the knowledge and experience to determine the appropriate pressure, cleaning agents, and techniques to use based on the type of roof you have. They will also have the necessary equipment to reach all areas of your roof, ensuring a thorough cleaning. Additionally, professionals can identify any potential issues or areas of concern during the cleaning process, allowing for prompt repairs and maintenance to prevent further damage.
Regular maintenance is key to extending the lifespan of your roof and preventing costly repairs. By scheduling routine inspections and maintenance with a professional, you can catch any small issues before they become major problems. During these maintenance visits, professionals can clean your roof, remove debris, and check for signs of damage or wear. They will also be able to provide recommendations on any necessary repairs or improvements to keep your roof in top shape.
Remember, your roof is a crucial component of your home’s structure, and neglecting its maintenance can lead to leaks, mold growth, and structural damage. By investing in professional help and regular maintenance, you can ensure that your roof remains in optimal condition for years to come.
Conclusion
 In conclusion, pressure washing your roof can be a challenging task, but with proper preparation and the right equipment, it can be done effectively. Remember to prioritize safety by wearing protective gear and taking precautions to avoid accidents.
Choose a suitable cleaning solution for your specific roof type and make sure to set up the pressure washer correctly before starting. Use the appropriate techniques to clean the roof, such as starting from the top and working your way down in a sweeping motion.
After cleaning, rinse the roof thoroughly and allow it to dry completely before inspecting for any signs of damage. Regular maintenance is essential to keep your roof in good condition, so consider scheduling professional help and routine maintenance to ensure its longevity.
By following these steps and taking care of your roof, you can maintain its integrity and enhance the overall appearance of your home. Remember, a clean and well-maintained roof not only adds value to your property but also provides protection for years to come.
Recent Comments