 The warm summer months are almost here and that can only mean one thing: it’s time to spruce up your outdoor living space. From pressure washing to staining, there are a lot of steps involved in prepping your deck and patio for the upcoming season. But have you ever wondered how long after pressure washing you have to wait before you can apply a fresh coat of stain? Whether you’re refinishing an older deck or simply giving your existing one a makeover, this article will provide all the information you need to know about how long after pressure washing you must wait before applying stain. So, if you’re ready to get started on your outdoor renovation project, keep reading!
Decks and patios are great spaces for entertaining and relaxing with friends and family during the warmer months. But over time, exposure to the elements can take its toll on wood surfaces, making them look dull and lifeless. Pressure washing is a great way to remove dirt, grime, algae, moss, and more from wood surfaces – but did you know that there is a certain amount of time that must pass before it’s safe to apply a protective coat of stain?
In this article, we’ll discuss why it’s important to wait after pressure washing before staining as well as provide helpful tips on how long after pressure washing should be waited before staining. So if you’re looking for advice on how long after pressure washing you should wait before applying stain – read on!
Understanding The Basics Of Pressure Washing
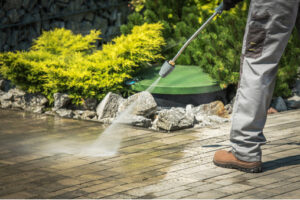
Before you even consider staining after pressure washing, it is important to understand the basics of pressure washing. Pressure washing, also known as power washing, is a cleaning service that uses high-pressure water to remove dirt, debris, and other unwanted materials from hard surfaces like siding and concrete. Pressure washers are commonly used by house cleaning services to restore the original look of a home’s exterior.
When using a pressure washer for any kind of cleaning service, it is important to follow the instructions carefully in order to avoid damaging the surface being cleaned. After pressure washing, you should wait until the surface has completely dried before applying any stain or sealant. Depending on environmental factors such as air temperature and humidity levels, this can take anywhere from 1-2 days up to a few weeks or even months in some cases. It is always best to read the instructions on your particular product carefully before beginning any project.
Benefits Of Pressure Washing Before Staining
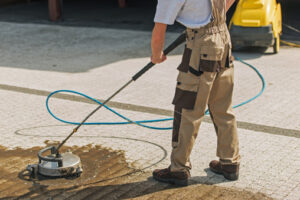
Pressure washing prior to staining offers many benefits. For starters, it helps to remove dirt, debris, and other impurities that may have built up over time on the surface of your home’s exterior. This ensures a consistent finish when applying the stain or sealant and also prevents any discoloration or fading caused by trapped contaminants. Additionally, pressure washing is an effective way to remove any mildew or mold that might be present, which can lead to issues with the longevity of your stain job if left untreated.
Finally, pressure washing prepares the surface for a more successful staining process by eliminating irregularities in the material that can cause an uneven look once the stain is applied. Furthermore, it helps to minimize chipping and peeling of paint due to moisture absorption from staining too soon after cleaning. By taking these steps before beginning any staining project, you can ensure a neat and professional finish that will last for years.
Preparation For Pressure Washing
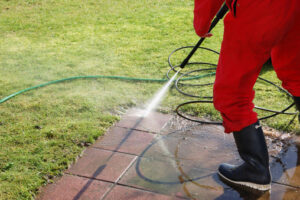
Before beginning a pressure washing project, it is important to assess the area and properly prepare for the job. The first step is to check for any loose paint or debris that could be blown away during the cleaning process, as this could damage nearby surfaces or objects. Additionally, any furniture or objects that may be in the way should be moved to a safe location so they do not get damaged by the water pressure.
It is also important to make sure there are no electrical sources near the area being cleaned as pressure washers can cause significant damage if used incorrectly. Furthermore, if necessary, take steps to protect windows and other glass surfaces from potential water damage by covering them with plastic sheeting. Finally, use caution when operating the pressure washer and avoid aiming it at yourself or anyone else around you. Following these steps will help ensure a successful outcome when completing your pressure washing project.
Factors Affecting Timeframe For Staining After Pressure Washing
 Now that the pressure washing is complete and all necessary preparations have been made, it is important to consider the timeframe for staining the surface. This timeframe can vary significantly depending on a number of factors such as the type of wood, climate, and humidity levels. For example, high humidity levels can cause wood to absorb more moisture which will delay optimum staining conditions. Additionally, if the pressure washer was used at too high of a pressure setting, it could cause damage to the wood’s surface which would need to be repaired before staining.
When possible, it is best to wait 24 hours or longer after pressure washing before attempting to stain in order to ensure that all moisture has evaporated from the wood’s surface. If possible, use a moisture meter and keep an eye on humidity levels in order to determine when staining can begin. Taking these precautions will help ensure that you get the best results for your pressure washing and staining projects.
Drying Time After Pressure Washing
After pressure washing, it is important to allow the wood to dry completely before attempting to stain. The amount of time needed for drying will depend on several factors, including the type of wood, climate, and humidity levels. Generally speaking, hardwoods may take longer to dry than softwoods due to their higher density. Additionally, high humidity levels can cause the wood to retain more moisture which can further delay drying times.
It is recommended that wood surfaces be allowed to dry for at least 24 hours after pressure washing before staining. If possible, use a moisture meter to check the moisture level of the wood and monitor humidity levels in order to determine when it is safe and ready for staining. Taking these precautions will help ensure that your project has the best chance of success.
Environmental Conditions And Drying Times
When it comes to determining the amount of time needed for the wood to dry after pressure washing, environmental factors can play a big role. Temperature, humidity, and air circulation all have an impact on drying times, with higher temperatures and lower humidity levels resulting in faster drying times. Additionally, windy conditions can help speed up the drying process by removing moisture from the surfaces more quickly.
Therefore, it is important to take into account environmental conditions when determining how long to wait before staining a pressure washed surface. If possible, try to schedule staining during periods of warm and dry weather with good air circulation in order to ensure that your project achieves optimal results. With careful consideration of these factors, you can ensure that the wood is properly dried and ready for staining when you are ready to begin your project.
Damage To Surface From Unsuitable Conditions
In spite of the importance of environmental conditions for quick drying, it is still possible to cause damage to the wood if staining is attempted too soon. Without proper drying, moisture can become trapped beneath the stain and cause discoloration and premature wear. Furthermore, this moisture can also lead to mildew growth or other forms of decay that can weaken the wood’s surface over time.
Therefore, it is best to wait until the wood has had adequate time to dry before applying a stain. This can vary depending on environmental factors, but as a general rule of thumb it is advisable to wait at least 48 hours after pressure washing before staining. This will help ensure that your project is successful and will look great for years to come. Taking this extra precaution will ensure that you have a beautiful finish without any unexpected problems along the way.
How To Test Surface Readiness For Staining
Now that the surface has had a chance to dry, it is important to test it for readiness before staining. Testing the wood’s moisture level will help ensure that you get the best results possible and will prevent any problems from occurring during the staining process.
The easiest way to do this is by using a moisture meter. Moisture meters are easy to find at most hardware stores and are relatively inexpensive. Simply insert the probe of the meter into the wood in several places and take note of the readings. If any of them exceed 12%, then it is not yet ready for staining. It may be necessary to wait an additional day or two until all readings are below 12%.
Once you have determined that the wood is ready, you can move forward with your project knowing that you will be getting great results! Staining too soon can lead to problems later down the line, so it is important to make sure that everything is done correctly from start to finish.
Different Types Of Stain And Their Application Timelines
 Once you have tested the wood for readiness, it is important to choose the right type of stain for your project. Different stains require different application timelines and can vary greatly in terms of the results they produce. Oil-based stains typically require more drying time than water-based stains and should be applied at least 24 hours after pressure washing. Water-based stains, on the other hand, can be applied within a few hours of pressure washing.
It is also important to consider how long a given stain will take to completely dry before applying a second coat or moving furniture back onto the surface. Oil-based stains may take up to 36 hours before they are completely dry, whereas water-based stains may only take around 6 hours. To avoid any problems, it is best to check the manufacturer’s instructions and make sure that you allow enough time for the stain to fully dry before taking any further action.
Applying Stain In Ideal Conditions
Now that you have chosen the type of stain and are aware of its drying timeline, it is important to consider the conditions in which you will be applying it. Ideal conditions for staining include a temperature between 65 and 85 degrees Fahrenheit, with low humidity and no chance of rain. Additionally, staining should be done in an area with adequate ventilation, as oil-based stains can emit strong fumes that can be harmful if inhaled.
It is also important to make sure that the surface is clean before applying any stain. If necessary, pressure wash the surface again to remove any dirt or debris that has built up since your initial cleaning. Once the surface is clean, use a brush or roller to apply a generous coat of stain in long sweeping strokes. Make sure to cover all areas evenly and avoid overworking any one area as this can cause excess absorption and create an uneven finish. Allow sufficient time for the stain to dry completely according to manufacturer’s instructions before proceeding with a second coat or moving furniture back onto the surface.
Tips For Working With Stain In Hot Weather Or High Humidity
Working with stain in hot weather or high humidity presents some unique challenges. The heat and moisture can cause the stain to dry too quickly, resulting in an uneven finish. In addition, high humidity can cause the solvent to evaporate too slowly, making it difficult for the stain to penetrate deeply into the wood. To mitigate these issues and ensure a successful staining job, it is important to adjust your application process accordingly.
First, reduce the amount of time between pressure washing and applying the stain. If possible, try to apply the stain within 24 hours after pressure washing so that there is still some moisture in the wood when you begin staining. This will help keep the surface wet enough for easy application and absorption of the stain. Additionally, take extra care not to overwork any one area during application as this can lead to an uneven finish. Finally, be sure to look out for signs of drying while applying the second coat and move on to another section if necessary so that you don’t end up with patchy results due to over-drying. With these tips in mind, you’ll be able to successfully stain your deck or patio no matter what kind of weather you’re working with!
Considerations For Stain Color Selection And Coverage Level
When selecting and applying stain, it’s important to consider both the color you want and the level of coverage you need. Different types of wood and existing treatments can also affect the finished result. To ensure a successful outcome, be sure to do some research before committing to a particular color or coverage level.
When it comes to choosing a stain color, start by evaluating the type of wood you are working with. While some woods look great with dark stains, others have a more natural appearance that is better suited for lighter shades. Additionally, existing treatments such as sealants or oils can also influence what colors will best suit your project. Once you have narrowed down your options, test out some samples on an inconspicuous area of the wood to make sure that the results meet your expectations.
When it comes to determining coverage levels, keep in mind that two thin coats are generally better than one thick coat as this allows for more even absorption of the stain into the wood fibers. As always, try testing out different levels of coverage on a sample area first so that you can see how the stain looks on your specific type of wood before committing to a full application. By taking these considerations into account when selecting and applying stain, you can ensure that your project turns out just how you envisioned it!
Cleanup Methods After Applying Stain
Now that you have chosen your color and coverage level and applied the stain, it is time to move on to the cleanup process. Pressure washing is often used to remove excess stain from surfaces prior to staining and can also be a great way to prepare the surface for a new finish. However, it is important to note that you should wait at least 24 hours before applying a new finish after pressure washing in order to ensure the surface is completely dry.
When doing any type of staining or finishing job, proper cleanup is essential for achieving optimal results. Depending on the type of finishing material you are using, there are various methods available for cleaning up after application. For oil-based stains, mineral spirits should be used as they will help break down the materials without leaving behind any residue. For water-based finishes, warm soapy water can usually be used as this will safely remove any remaining material without damaging the wood fibers. Once all of the residue has been removed, be sure to allow plenty of time for drying before adding another coat or layer of finish.
Protecting Newly-Stained Surfaces
Once the surface has been properly cleaned and dried, it is important to take steps to protect your newly-stained surfaces. The first step is to apply a sealer or varnish that is designed to provide additional protection against water damage and UV rays. This will help ensure the stain lasts longer and retain its original color. Additionally, regular cleaning with a soft cloth can help keep the surface free of dirt, dust, and other debris that could potentially damage the finish.
In order to maintain the longevity of your stained surfaces, it’s also important to avoid placing objects directly on them. Placing furniture or other items on top of freshly-stained surfaces can cause scratching or fading over time. If you do need to place items on them, use protective mats or pads that are specifically designed for use with wood finishes in order to prevent any damage from occurring. Taking these simple steps can help ensure your newly-stained surfaces look great for years to come.
Maintenance Guidelines To Prolong Life Of Stained Surface
 In order to ensure that your stained surface remains in the best condition for as long as possible, there are certain maintenance guidelines you should follow. First and foremost, wait at least 48 hours after pressure washing before applying a stain. This will allow the wood enough time to dry completely and prevent the stain from being absorbed unevenly. Additionally, reapplying a sealer or varnish every few years can help protect the surface from UV rays and keep it looking like new.
Regular cleaning is also key to preserving the life of your stained surfaces. Use a soft cloth or sponge with mild detergent and warm water to gently wipe away any dirt or dust build-up. Be sure not to use any harsh chemicals or abrasive materials that could damage the finish of the wood. By following these simple steps, you can ensure that your newly-stained surfaces look great for years to come.
Conclusion
Pressure washing is an effective and efficient way to prepare a surface for staining. It removes dirt, debris, and other contaminants that can interfere with the stain’s ability to adhere properly. However, it’s important to allow adequate time for the surface to dry before staining in order to achieve optimal results. Factors such as humidity levels and temperature can affect the drying time after pressure washing, so it’s wise to check the weather forecast before beginning any outdoor pressure washing projects. Additionally, proper preparation and cleanup methods should be used before and after applying stain in order to ensure long lasting results. By following these simple steps and adhering to recommended maintenance guidelines, you will be able to enjoy your newly-stained surfaces for years to come.
Recent Comments